What is D1?
Built on SQLite, D1 is Cloudflare’s first queryable relational database at the edge.
With D1 currently in Alpha, you can truly go full-stack and build rich apps including eCommerce sites, accounting software, SaaS solutions, CRMs and more.
How do I use it?
D1 is a relational database, which means that it stores data in tables. These tables are made up of columns, which are the different types of data that you want to store. For example, you might have a table called users, and it might have columns for id, name, email, and password.
How do I interact with it?
To start, we’ll create a D1 database. We can do this by running the following command:
npx wrangler d1 create <NAME>Where <NAME> is the name of the D1 Database you wish to create. This will create a new D1 database, which can be seen by running npx wrangler d1 list.
If you want to interact with your database, you can use wrangler’s D1 execute command. This will allow you to run SQL queries against your database. For example, if you wanted to create a table called users, you could run the following command:
npx wrangler d1 execute <NAME> --command "CREATE TABLE users (id INTEGER PRIMARY KEY, name TEXT, email TEXT, password TEXT)"However, if you have large commands, this approach may not be ideal, so you can also interact with it by supplying a file argument, for example:
npx wrangler d1 execute <NAME> --file ./path/to/file.sqlUsing D1 in your Worker
We’ll start by creating a basic worker with wrangler init. We’ll call it d1-demo.
mkdir d1-demo
cd d1-demo
npx wrangler init
Now, you can run through the steps to configure your worker. For this example, we’ll be using TypeScript, so we’ll select typescript when asked what language we want to use, however you don’t need to do this if you want to use JavaScript. Your output should look something like this.

Now, navigate to your src/index.ts file and replace the contents with the following:
interface Env {
	DB: D1Database;
}

export default {
	async fetch(req: Request, env: Env) {
		const result = await env.DB.execute("SELECT * FROM users");
		return Response.json(result);
	},
};
You’ll need to modify your wrangler.toml file to include your D1 Database. It should look something like the following:
name = "d1-demo"
main = "src/index.ts"
compatibility_date = "2022-11-18"
[[d1_databases]]
binding = "DB" # aka available under env.DB
database_name = "d1-demo" # aka the name of the database you created
database_id = "my-d1-uuid-absjasddsalksdakjdshkj" # aka the id of the database you created
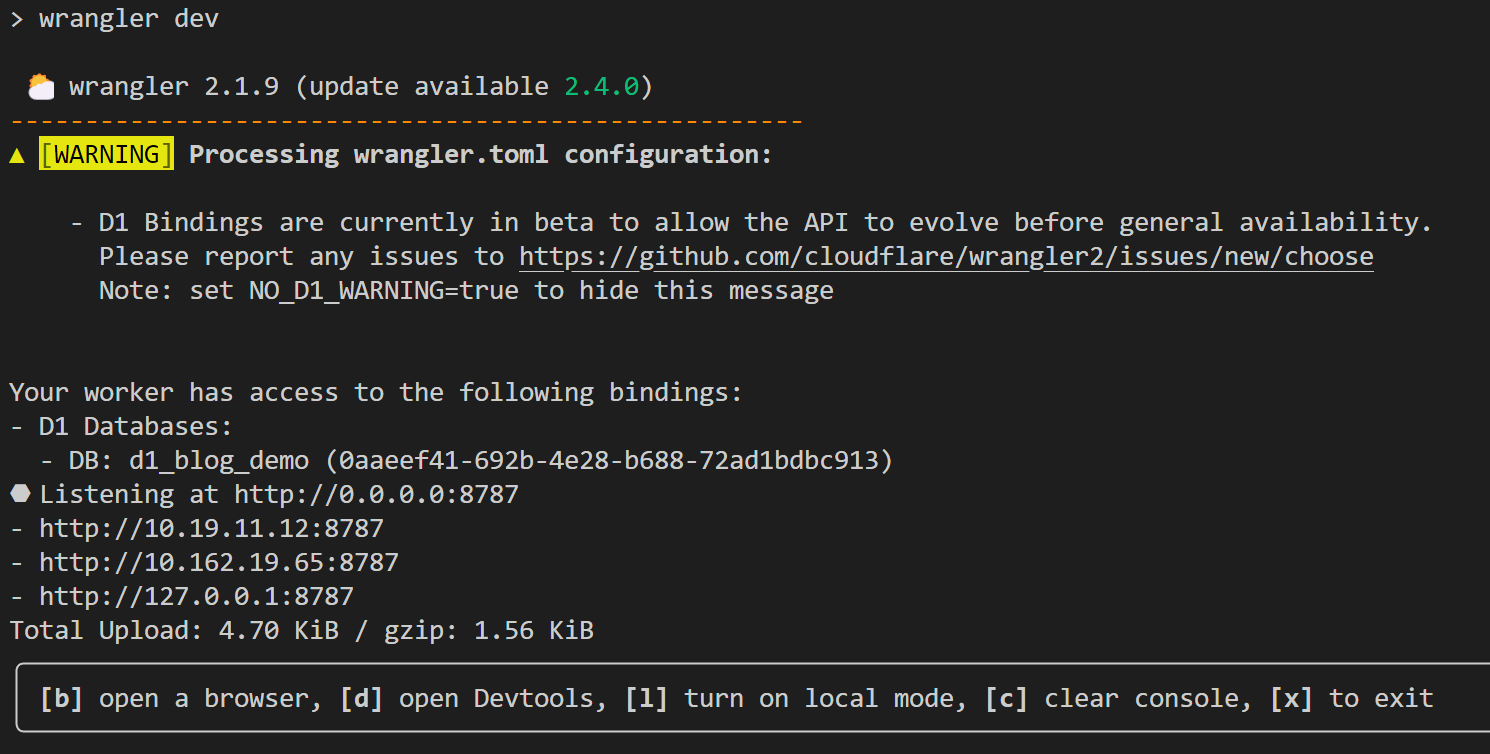
preview_database_id = "my-d1-uuid-absjasddsalksdakjdshkj" # this is the id of the database used for wrangler devWhen running wrangler dev, you should see your worker start, looking something like this:
However, writing SQL queries in your worker code isn’t ideal, so we’ll use a library called D1-ORM to help us out. We’ll start by installing it.
npm install d1-ormYou can also use yarn or PNPM if you prefer.
Using D1-ORM
D1-ORM is a library that allows you to interact with your D1 database using TypeScript. It’s dependency free, and takes full advantage of TypeScript’s type system to ensure that your queries are type safe. We’ll start by creating an ORM instance.
import { D1Orm } from "d1-orm";

//... your other code
const orm = new D1Orm(env.DB);
Now, let’s create a Model for our users table. Models are classes that represent a table in your database.
import { Model } from "d1-orm";

//... your other code
const users = new Model(
	{
		D1Orm: orm,
		tableName: "users",
		primaryKeys: "id",
		autoIncrement: "id",
		uniqueKeys: [["email"]],
	},
	{
		id: {
			type: DataTypes.INTEGER,
			notNull: true,
		},
		name: {
			type: DataTypes.TEXT,
			notNull: true,
			defaultValue: "John Doe",
		},
		email: {
			type: DataTypes.TEXT,
			notNull: true,
		},
	}
);
Let’s walk through what that code does. First, we create a new instance of the Model class. This class takes an object as an argument, which has the following properties:
- D1Orm: This is the instance of D1Orm that we created earlier.
- tableName: This is the name of the table that this model represents.
- primaryKeys: This is the primary key of the table. If you have a composite primary key, you can pass an array of strings.
- autoIncrement: This is the column that auto increments. This can only be set on primary key columns, and does not work with composite primary keys.
- uniqueKeys: This is an array of arrays of unique keys. That’s a little confusing, so let’s look at an example. When
[['email']]is set, the email column is unique by itself. However, let’s say we wanted to make a combination of columns unique. For example, we might want to make the combination ofemailandnameunique. We can do this by settinguniqueKeys: [['email', 'name']]. This means that there can only be one row in the table where the email and name are the same, however the same email can be used with different names.
The second parameter of this class dictates the structure of the table. This is an object where the keys are the column names, and the values are objects that have the following properties:
- type: The type of your column, for example
DataTypes.INTEGERorDataTypes.TEXT. - notNull: Whether or not this column can be null. (optional)
- defaultValue: The default value of this column. (optional)
For those using TypeScript, we can automatically infer a type from our Model using the Infer type alias. This will allow us to have a type that’s always up to date with our database schema.
import type { Infer } from "d1-orm";

//... your other code
type User = Infer<typeof users>;
It’s as simple as that! Now, we can use our Model to interact with our database. Let’s start by creating a new user.
import { D1Orm, Model, DataTypes } from "d1-orm";
import type { Infer } from "d1-orm";

export default {
	async fetch(req: Request, env: Env) {
		const orm = new D1Orm(env.DB);
		const users = new Model({
			D1Orm: orm,
			tableName: 'users',
			primaryKeys: 'id',
			autoIncrement: 'id',
			uniqueKeys: [['email']],
		}, {
			id: {
				type: DataTypes.INTEGER,
				notNull: true,
			},
			name: {
				type: DataTypes.TEXT,
				notNull: true,
				defaultValue: 'John Doe',
			},
			email: {
				type: DataTypes.TEXT,
				notNull: true,
			},
		});
		type User = Infer<typeof users>;

		const result = await users.InsertOne({
			name: 'John Doe',
			email: '[email protected]",
		})
		// That's it!
		return Response.json(result);
	}
}
In that code snippet, we created a new Model, and passed an object as the second argument. This object is the schema of the table. It’s a little verbose, but it’s used to automatically provide your types. The library also exposes a Model.CreateTable method that uses this schema - if you so choose. For example, we can run await users.CreateTable() to create the table. However, you shouldn’t run this for every request - as it’s not necessary. Instead, you should run it once, and then never again. Once you’ve used it - you can use D1’s Migrations to keep your database up to date with your schema.
The Model also exposes a number of other methods, including:
- InsertMany
- First (SELECT .. LIMIT 1)
- All (SELECT ..)
- Update
- Delete
- Upsert (Insert ON CONFLICT DO UPDATE) - read upserting in D1 for more information.
For more information on these methods, check out the D1-ORM documentation.
Conclusion
I hope you’ve enjoyed this article, and I hope you’ve learned something new. If you have any questions, feel free to reach out to me on the Interactions.Rest Discord.
Thanks for reading!